I was reading through this site today, a blog from the designer of the famous Polaroid rainbow, "The Branding of Polaroid 1957-1977". Made me want to look through my own stuff and post a few interesting Polaroid boxes I have and some of the junk that comes inside. This is the available Pack film circa 1960 or 1970-something, from my Colorpack II booklet. I want them all. If time travel were possible, I'd use it to do the completely useless and go back and buy a bunch of cool film.
First up is my oldest, a box of Type 108, expired November 1976.
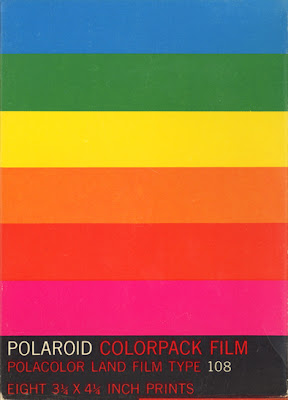
Now that is a pretty box. Bought as a collector's piece, but I tried to use the film, of course. I think someone once left a slightly negative comment around here about expired film and that it should be in a museum. I think it was disdain, but maybe I'm wrong. But, anyway, the thing about film is...it just goes bad. The older it gets, it just turns to plastic. So why not use it? I save everything else (wait until my exciting post about 120 paper backings!), but the film just turns to crap. And in the case of roll film, it actually can ruin the backing, bonding with it, making it that much more useless. Not much of a surprise, but film that doesn't work isn't worth much, no matter the pretty box around it. I think I paid maybe 8 bucks for this beauty. And the film? Completely useless. Dry as a bone. But the box has aesthetic value to me, and I collect stuff (unfortunately). And I was a child in the 70s, so flashbacks galore. Memories of sitting at Grandma's and reading Humpty Dumpty magazines with monster movies on channel 32, WFLD out of Chicago on Saturday afternoon.
Moving on...here's some stuff that was inside the box, including the instructions.
I've never used the cardboard backings. I'm not much into ruining my photos (no gluing family photos into an album like my grandmother did). But I have a bunch of them...maybe be of some use someday. For the dupes photos, they must have used a copier and took another shot and made a neg or something.
Next up is a pack of Type 88, expired September 1977, along with a dupe mailer.
I haven't used this film. I figure it can't be much better off than the 108. Maybe I'll rip into it some day, maybe I'll leave it alone. It lives in the fridge now.
We jump to a box of black and white Type 107, expired July 1983.
I have three boxes, sans film. I used the film. It actually worked quite well. Had to up the contrast a bit when scanning, but the results were lovely. I used the original goop stick. It was still goopy, but coverage was a bit off. That's okay...part of the fun.
And here are the instruction that came in the box:
This Type 668 I bought without a box, and probably spent too much for it. The date on the pack is 1984, so it expired sometime in the 80s, I assume.
It didn't really work. A little tiny bit, but mostly not at all.
At least I was entertained for a few minutes. And I discovered that you can take a pack out in daylight and only the top shot will be exposed. Not that you want to waste film, but when I first loaded this film, I was out in the desert, and after a couple shots decided I wanted film that worked, so I took it out and saved it.
Here is box of Type 88 that expired September 1996. Much newer, and much nicer results. You can see the transition from the rainbow to the blue, or 'blah' box.
And, for good measure, here is the current 'blah' box.
Though not for long, as evidenced by this nasty sticker:
Sad, sad days. I have a stash of Polaroid, but it's going to suck when I run out. Can't even find Type 80s anywhere. Still a fair amount of Type 100 (667, 669, etc.) and Fuji makes an instant film that fits 100 film backs...soon, though, it may all be gone.
Just for fun, a few scans from some old instruction booklets. First a quick guide to taking (or...MAKING) a Polaroid photo. When I bought my Square Shooter, I had to scratch my head a minute to figure out how to pull the film out. I had a Polaroid when I was a kid, but that was 25-30 years ago. Another more stupid than funny story, but the first pack I shot a couple years ago, all the photos came out black, UNLESS I was just aiming at the road...then they were boring but it worked. It took me two days to figure out: I KEPT AIMING DIRECTLY AT THE SUN. Dumbass. Screws up the meter.
A few groovy pictures here, teaching you some basic photography. Digging the shot of the guy just released from prison.
Last, we have a page of helpful tips, or what they snidely refer to as "trouble". Never had the white vertical bars on my photos. Gonna have to try that one out! More ways to abuse my film...
And only medium-fast...not slow-fast or fast-fast. Just...medium-fast. Words to live by. Peace.
Monday, June 25, 2007
Thursday, June 21, 2007
Inside without a flash
A few weeks ago I took a day trip to a ghost mine known as Vulture Mine, about 12 miles south of Wickenburg, AZ. I was actually planning on visiting a few other mines on the way, but I managed to get stuck in the Hassayampa river (dry, of course).
After a very nice rancher pulled me loose with his tractor, I said to hell with all that and just drove to my main destination. Best ghost town I've been to. Easy to access, but far enough away from civilization that I was mostly alone. I had my Polaroid 195, the Square Shooter, Holga, Snappy, and a couple other vintage cameras that I only shot a few pictures with. Too many cameras for such a short trip. And it was hot.
Anyway, the place was really amazing. And all the really cool stuff was inside. I don't have any flash attachments for my toys (the Holga has a flash, though), and I don't really like a flash, anyway, as they tend to reach like 4 feet and light everything up all funny with odd shadows. And I'm not 'professional' with lights and fancy cameras and stuff. So what to do? Well, I mostly shoot outdoors, but I really wanted to take pictures of this place. So I experimented with each camera to see what I could accomplish indoors with natural lighting.
First the Square Shooter. By far the easiest, because it has auto exposure. As long as the camera is steady, the shutter will stay open almost forever depending on the light. But, I know from experience that one shutter release will still make for a pretty dark shot, so I took advantage of another nice Polaroid feature...the ability to take multiple exposures on a single sheet. I clicked the shutter at least twice, three times on a few shots. On a stable surface of course. Used a piece of wood or broken glass to prop up the nose so I wouldn't just be shooting the floor. The effect is interesting in that the bright areas are very overexposed, while the darker areas are relatively low in contrast. Makes for some nice photos. Enough talk, here are some interior flashless Square Shooter shots.
Next up is the Polaroid 195. Much tougher. I have a light meter, but that's pretty much useless in a dark room, as it doesn't register anything. I never use it anyway and have gotten pretty good at setting the aperture and time with the magic of guessing. I had a few shots that were way underexposed or all white. I did all of my guesswork with the second half of a pack of 669, so I only got two semi-decent color shots. The sweet settings were somewhere around 8 for the aperture and about 2 seconds on Bulb.
The next pack through the 195 was my last expired 107, 09/1983. Perfect film for dusty, old ghosts, I figured. I had my exposure worked out perfectly...
And managed one window shot with 'outdoor' settings. I was using the original goop that came with the film pack. A bit crap by now, of course, but it's just more magic to me.
Okay, that's what I achieved with the Polaroids. Square Shooter: take advantage of the auto exposure, but don't trust it fully. It's smart, but not that smart. Broken glass and wood to keep it steady. 195: take advantage of the HUGE aperture available with this camera. At 8, your opening is about half an inch. That is crazy big for a Polaroid. This was Type 107, also, which has an ISO of 3000. If you look at the 3000 setting on an automatic Polaroid, it's like a large pinhole. You can open the aperture on the 195 to over an inch. I've overexposed shots in a dark room at that setting.
What about the Holga? I have a basic Holga 120SF. Has a flash that I use occasionally, but I mostly just use it outside. I don't usually use a mask, so the batteries have to be taped in, which actually changes the shape of your photos. So, not much luck with indoor shots. Someday I'm going to get a Holgamod with the Bulb setting. This is about as good as it gets in low light.
How do you get lightleaks in a dark room? The beauty of toy cameras.
The Snappy (a Diana clone) is easier to deal with indoors. It has a Bulb setting, so it's just a matter of guessing how long to leave the shutter open. I really haven't done much indoor work with any of my toy cameras, so I just guessed at the exposure time. I went with 10 seconds, as it was dark, but there was still light from the windows. And, again, I had to keep the camera stable. I expected the shots to be underexposed rather that over, but I was pleasantly surprised. I had it right on the mark, I think. Maybe slightly overexposed, but I like the effect.
All in all, a fun day, except for being stuck out in the desert. Did a little experimenting, saw the sights. I will most definitely be heading back to Vulture Mine to shoot some more. Maybe later, though. I'm kind of sick of looking at all these pictures of the place.
I leave you tonight with a dead bird trapped in a window. His beauty lives on in another form.
Friday, June 08, 2007
How close is too close?
Spurred on by this discussion on filmwasters.com, I decided to see how close I could get a pinhole to Polaroid film and still get an image. I started with a Propack camera that I picked up at Goodwill for like 5 bucks. Didn't work, of course. Cut and tore off the front so I just had a back for holding film. Been wanting to do something with this for awhile, maybe stick it to a Diana, or build something new. So I have this Propack back. I wanted cheap and fast, so I used a Heart Healthy cereal box and aluminum foil for the pinhole. And tape, but not so much. I wasted film, but not tape. Hmmm? Aaaanyway. So here's the resulting pinhole camera.
I love the Adult Probation Dept. sticker on the side. This camera must have a fun history. I wonder how many convict headshots have gone through this thing?
As you can see, flat. The focal length is around 3/4 of an inch or less, which is about 1.5 centimeters. I used Type 664 black-and-white film. The first pinhole was fairly large and exposed for around 2 seconds. Too large and too long. (Hey! I know what you're thinking about. Clean it up...or call me.) This is what happened:
Fantastic! not. That's two McDonald's ice cream cones worth of film right there. The price of art. Reduced the exposure time, and actually got something almost recognizable. That's me, the big dark area in the middle. Hi. Nice to meet you.
Still not good, so I reduced the size of the pinhole. Scientific measurement? Less of the pin pushed through the foil. Smaller pinhole. Hey! Wow, that's actually pretty cool.
I like that. But the next shot didn't look as nice, so I decided to use a real pinhole that came with a Japanese 35mm pinhole camera kit I bought online. Really small aperture. Exact size? Really, really small. I've used it before and know that exposure times are about 10 times my foil pinholes, so 5 to 10 seconds, depending on light. After a few misses with exposure time, I got one right, in the shade at about 10 seconds.
Odd that it retained the shape of my head...no distortion at all. I would have thought I'd be deformed or something. So, as you see, close to the film, tiny pinhole equals tiny photo on large film. I'm almost through a pack of film here. I tried one more with the tiny pinhole indoors. A picture of one of my cats, exposed for a 60-second mental count, which is probably like 74 seconds.
See the cat? There on the right side. Me neither. Funny story. Well, not so funny, more stupid, but I lost the tape for the pinhole cover while exposing the shot. I seriously lost it while sitting in one place, not moving, looking at the same spot the entire time. Probably on the cat. So I covered it with my thumb, slipped a few times, so the ceiling light is in the shot, and probably a few other unidentifiables.
I needed to try once more. You know how that goes. Took off the tiny pinhole, made another foil pinhole, got this beauty.
Photoshop only dreams of such perfect flares. Like a supernova. Okay, not that exciting, but I like it. Has a simple, if unoriginal, beauty.
So that was it. Today's pinhole Polaroid experiment. But wait, you say, how did you keep changing pinholes without ruining the film? Went into a dark bathroom (3 blocks down and to the left), and stored the film in my Super Shooter while changing pinholes, then swapping the film back into the pinhole in a dark bathroom (this one just around the corner). Does it matter? The details always matter. I've always wondered if you take a film pack out of a Polaroid, will all the film be ruined, or just the top shot? Well, I've always wondered since I've been storing a half used pack of expired color film that I didn't want to keep using at the time. Is it destroyed? Some day I'll check it out.