Nothing like made-up high-tech words. Sooooo...I've thought about grappling with this beast for awhile. I'm certainly not the first person to do this. There seem to be a fair amount of 110/110A/110B conversions to pack film out there. They do, in fact, sell for quite a bit. But I wouldn't buy something I could do for myself! Wait, what am I talking about? For all of you that have no idea what I'm talking about! Let's start with the camera.
Polaroid roll film cameras are different that pack film cameras. I've talked quite a bit about
pack film in the past (what I refer to as peel-apart, though roll film is also peel-apart), and had one post about my
150, a low-end roll film camera (amazing that something that nice looking is low end). Roll film is the precursor to pack film, so the cameras are, of course, older. Roll film has also not been produced since about 1990, and finding working film rolls is getting tougher and tougher. So what to do with these cameras? Well...why not convert them to use pack film?
There are various roll film camera models, and actually there are three roll film sizes. Type 40 is the largest and closest in size to Type 100, so these are the cameras that get converted. And there are mostly lower-end cameras with fixed shutter speeds, and a couple nice high-end cameras comparable to the 180/195 series. These are the cameras that are most sought after for conversion...the 110, 110A, 110B and 120. You can read more about the differences in these on the Land List
here. I chose to use a 110A because I got a good deal on eBay. 110Bs are the most popular just because they have a couple minor improvements over the 110A. Some people convert the 'lesser' models as well. Here is my 150 next to my 110A. See the obvious difference in the lens quality.
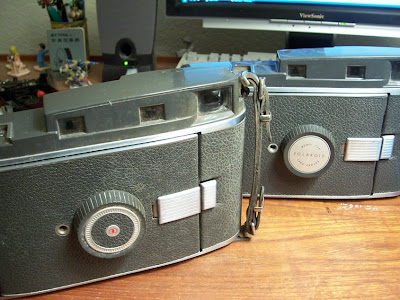
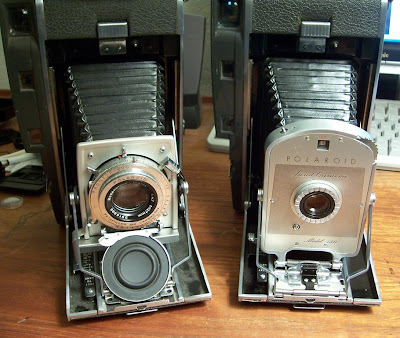
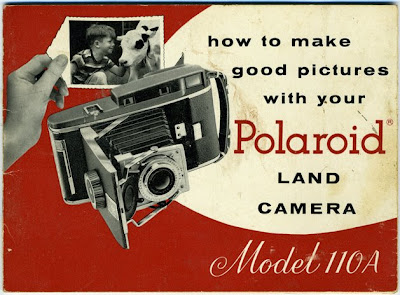
Okay, so the 110A (the camera with the fancier lens above). I'm not going to talk a bunch about the roll film camera and how it works...you can check out my 150 article for that. Here are a couple pages from the manual, though. Love the illustrations, and a bit about the lens, as that's the main difference between the 150 and 110A.


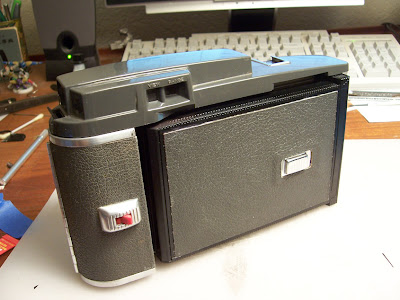
And the camera itself. You can see...she is very dirty (raowr!).

So...the conversion. It took me a couple days, I'd say maybe 12 hours total, but that included a few mishaps and re-dos. There are a couple resources out there to help with conversions. Land List has a
page with some decent step-by-steps. Option8 has a site that has a few tips, but the is site mostly a mess and difficult to follow. I couldn't even find the link to the conversion except through Google. I don't recommend it as a resource unless you are desperate for some pictures of the final product. Skorj has a nice
work-up as well (and this is what got me going on my own conversion, finally), and this was more useful for some of the step-by-step. I like to see things sequentially and logically. So these sites helped a bit as I felt the task to be a bit daunting before I started. Truth be told, it was much easier than expected. The few mishaps were just me not paying attention. The process is actually pretty straightforward and just requires a little bit of grunt work and a bit of determination and imagination.
Besides the camera itself, the other important ingredient is a pack film back. These can be found as separate entities and are used on the 600SE, ID cameras and scientific cameras (like my
oscilloscope camera). The Polaroid version is usually known as a CB-33 back. There are older metal versions and newer plastic versions. I would use a plastic model for this conversion just to keep the weight down, as the 110A is very heavy.

Some people also cut the packs from various folding cameras (like the Automatic 100). I chose to use my Fuji back, as it fit the best, being a bit narrower than the Polaroid back. So, back to taking this camera apart. First, need to remove those pins in the hinges to get the back door off. The pin for the main door hinge was actually one of the tougher tasks...I just had a lot of trouble getting it out. But if you screw it up, there are a couple other hinge pins in the camera that are easier to remove and can be used in the end product.

Basically just brute force to get it out, with a hammer and a pointy thing. This inside pin was in a tight area, so it was easier just to pull and bend.

There are three doors in a roll film camera, but you only need to worry about the main door and inside door at this point. Off, you have an open camera.

Next is to take the plastic top off. This camera uses a dual viewfinder system like the 195. The 110B has a single viewfinder like the 180 Zeiss finder. This was one of the useful things I got from Option8's site. There are four screws. One is on the flash mount on top, one is accessible on the front right, and the other two are on the inside back. They are all different-sized screws, so it's easy to figure out which one goes where when putting the camera back together.

There is also a wire for the flash. I just clipped it because I don't care about the flash. I can always add this functionality later if I want.
Next up is removing the bar on the end of the camera with the door lock. There are three screws inside and two underneath the skin. Peeling this skin off is a bit of a chore. It's glued on super nutty and the desire is to peel it off without damaging it for later use (though I found a perfect removal method for parts not attached to important things, which I'll mention when I get to that point). This end part isn't all that important, though, as it will just be discarded...but you want to save what you can.

You want to remove as much of the extra stuff as possible to reduce the weight of the camera. The rollers weigh quite a bit. Take out the guts from the large open area. This helps with weight reduction, plus this junk impedes the opening of your pack back once in place. This requires removing three screws and then a lot of brute force to get the roll holders out. Mine are metal, but it looks like Skorj's model was maybe black plastic? But it took a bit of leverage with a screwdriver to get them out. Save the plastic part with the screws, as it will need to be broken down into a smaller piece and reattached, because the springy pin the pops the front door open is located under this.

I covered the lens with tape to protect it. Some recommend taking it out, but I didn't really see the point and just want to keep it from getting dirty or scratched.
Next up is the manual labor step...cutting the end of the camera off so you can fit the bulky end of the pack back onto the camera. It has to be removed to you can fit it on and open the clasp, as well. Judging by other mods, I made my angle not nearly as severe. Didn't really see the need. I kind of went with the same angle as the clasp on the pack back so I could keep it as flush as possible. Some pictures of the procedure and then a few tips. I used a hack saw with a metal cutting blade for this step. Do yourself a favor and use a new blade. It's only a couple bucks for a pack of five blades.


I started by cutting the ends and then cutting the width from the front. The toughest part about this procedure is the beginning when you are trying to get the teeth to catch in the metal in the correct place. At first it just glides over it like ice. I wasn't about to start at one end and saw all the way down...no way to keep a straight line and end up in the same place on the bottom. The angle was off on each end almost from the very beginning. In retrospect, after cutting a later part, I found that it's actually better to do your long cut first (though equally difficult to get the first cut), then chop the ends off. Then you are starting with straight line and not trying to cut to make your ends meet that you had already cut.
Before you start cutting, you want to make sure you are cutting in the appropriate place, of course. The pack opening needs to line up with the opening in the camera. I put a dead pack of film in the back to make sure my placement was proper. The opening is larger than the film pack opening.
Simple tip...inside the 110A there is a metal plate. You need to remove this to keep your pack as close to the original film plane as possible. What you have left, as seen above, is a series of rivets. Other online references tell you to clip these rivets. If you are using a plastic back, this actually isn't necessary. I didn't believe it at first, but three of these rivets on top and three on bottom line up exactly with the screw holes in the pack film camera. And there is an indentation for the light seal as well, so the other rivets fit right into this space. So...if you line up your holes with the rivets, you have perfect placement for your pack. So place, measure, mark and cut. When you are done, the pack fits just right.


Notice I peeled back the skins. This is so you can fold them over your cut ends when done. I just used superglue and some clips until dry.

The pack itself fit perfectly into the space provided by the camera. but I had one problem...the back was wider in the hinge area than the lower body, so when I opened the pack back, it wouldn't fit into the area...it just pulled the pack out of the camera. Skorj's solution was to clip the metal in this area. I wanted to do as little damage to the camera body as possible, so I just shaved down the pack back with an Exacto and sandpaper. Then I colored it with black marker. Not all that pretty, but mostly invisible when the camera is put together.

As mentioned before, replace the plastic part that hold down the spring for the pop-open front. You have to cut it or break it down, as it gets in the way of the pack back if you don't.

All that's left is to cut the pack end to cover the gaping hole, and to decorate the camera somehow. I wanted my camera to look like a Polaroid camera. I didn't want it to look like a circus sideshow with purple snake skin. I like the vintage look of the camera itself and want to carry that theme forward. This was my original idea, which evolved into something else in the end. But here you can see what I did. Used some original parts, double-sided tape and superglue.


That skin? Super tip! State secret! If the part isn't attached to anything important, an easy way to remove it is to pour boiling water on it. While the metal is hot (careful kids with hot things), the skins peels right off in seconds. Requires almost no effort and saves the skin's integrity.
So the next step was to cut the end part. this was my first idiotic mishap. Cutting it is no different than cutting the camera body, and is actually a bit easier as it is thinner. Well, I measured this thing at least four times, drew my guide lines and cut.

Put it back together...and...W T F! I mean, seriously.
I'm off by a full five millimeters! If I scowled any harder, my face would have folded in on itself. Nice bonehead move. So...what to do? Well, fortunately, the 150 is the only camera that is built exactly like the 110A, and you can get a 150 for $7. Perfect purchase for spare parts. So I got another and re-cut the back door. DUMB!
Intermission! This is my desk when I'm working on stuff like this. Yeah, I lose stuff all the time...on my desk.

So, anyway, all I really have left to do is to secure everything. The metal plate you remove from inside the camera had little clips to hold the bellows in place. But this metal was super weak and seemed to be just a bit of insurance, and the bellows seem to be glued in place fairly well. I added a string of white glue along the edges just for extra.

All that is left at this point is to secure the pack back to the camera. I used epoxy gel for this task. A shot of the initial process, then realization.
You have to cover the bit of extra space in the pack where it hangs over the edge of the camera. I used a piece of Fuji film pack and black tape. Just cut it so it lines up with the photo edge of a pack.

And I thought I would be smart and take the back apart and epoxy the base onto the camera and then put it together after.

Okay...dumb move number two. Once the base in place, you can't get the pack back together because of the metal edge on the camera body. Not enough room to work the hinge around the pins. Sigh...
So, I had to pry the back off the camera. Epoxy sets fast. Fortunately, nothing snapped, and I was able to pop it off and put it back together and re-glue.
That's it! All that's left at this point is aesthetics. While I didn't think the skin job I did on the back was bad, it just didn't seem
right to me. It matched, but still didn't look vintage. I stared at the camera for awhile and thought about things for awhile and finally worked up a final look using the original back door of the 110A. I had to take the skin off so I could remove the film plate and rivets, and sand a couple of them down. Then I re-glued the skin back on. I didn't really like the open hinges, so I flipped another hinge from the camera and glued the old rivets in place and attached it to the pack back with double-sided foam tape. Amazing how everything is pretty much the same size! In the final pictures, you can see my flippy part on the end isn't cut quite straight because the rivets look a bit off. Or maybe the hinge thing is slightly crooked. Oh well, I did what I could. If I had an industrial saw, I could have done a straighter cut, but I think it still looks good. My other design choice that seems to differ from other conversions was the decision to not cut the plastic top at the same angle as the metal body. Didn't really see the point as I think it looks nice intact. It doesn't look ungainly and seems to flow with the end of the pack back end. I just had to shave off about a millimeter of plastic that was in the way of the back clasp. Everything looks nice, and the back looks like it
belongs.
Some camera conversion porn!


Looks pretty sweet! But how does she work? Light leaks are always a worry when doing projects like this...fitting foreign things to other things. But my back fit very nicely on the camera. After gluing everything together, I shined a flashlight all around the inside and outside in a dark room. I couldn't find a single point of light shining through anywhere. This morning, I threw in a pack of Type 690 and took a few test shots around my place. Nothing exciting, of course, but the results are swimmingly positive! And it seems to have an amazing depth of field and pinpoint focusing that I don't even see in my 180 and 195! Will have to compare at some point, and try some different film types, of course. 690 is a soft film. There are couple niggles with it, like the dual focusing window. I'm cool with that, but you have to make sure you focus dead center on the framing window or the shot won't be in focus. And the parallax is way off, but I'm assuming this was an issue with the original camera? It's hard to tell with expired Type 40. And the viewfinder shows more than what you get on the film, as well. I may have to take off the top at some point and make sure things line up inside like they are supposed to. Only other thing to do is to make the end piece secure when closed so it doesn't flop open. I figure a simple piece of felt or soft leather will do, just enough so it wedges tight when you close it (you have to be able to open it to get the pack back door open).


Handles beautifully, and is much lighter than the original camera. One of the turn-offs to using roll film is lugging the 40-pound camera around. Much sweeter now and comparable in weight to the 195, if just a smidge heavier.
As I already have other nice Polaroid cameras, this project was more a case of
want than
need. But I really enjoyed the project and plan on a few more conversions, probably with some different cameras. It really wasn't all that difficult and just requires a bit of patience and creativity. Want one for yourself? Make it, don't buy it! And use it! I don't like treating my cameras like showpieces. I like to use them and set them down in the dust while I peel my film. Cameras love to be used and abused. That's what it's all about. Wow, super long post today!
This is my
I can't believe I don't know how to use a ruler scowl.


