I live in a city metro area of about 3.5 million folks, 75 miles across from east to west, and there currently seems to be one single place that develops 120 film in house (as opposed to sending it out). Film is dead, long live film. So, best current solution? Develop the film myself!
There are plenty of online resources on film developing, but I've had a couple requests to do this post. Developing color film is really very easy, no more difficult than black and white...but it probably helps to have some experience with home developing. I'm not going to talk at all about black and white developing, as there are even more resources available (I recommend the book
Into Your Darkroom Step by Step), but I will go through color developing as if you don't have any idea what I am talking about. I don't even have a darkroom, just a bathroom without windows, and I pretty much develop all of my own film. Small learning curve for basic developing, and then the options are limitless, from kits to mixing your own chemicals. The way I do it is as basic and cheap as it gets...and it works! I will be using 120 film and C41 developing, but the same process works for 35mm (or 127, etc), but getting 35mm developed is easy as most drugstores and Walmart type stores develop 35mm color in house.
First off, you will need some supplies. The most expensive thing you will buy is a thermometer. You need to get a "real" thermometer, not something from the drugstore. Mine looks like this:
Chemical and water temperature is very important for all developing, so buy a decent thermometer up front to save some pain, and it will also last many years.
You also need a developing tank. There are many different brands, as well as plastic tanks and reels, and metal tanks and reels. I use a plastic Patterson tank setup, good for a single 120 spool (that I feed two 120 rolls onto), or two 35mm spools. This is the tank that will be used to develop the film.
You need some kind of measuring container to measure out your chemicals. It should have milliliters and ounces on it, and for the Patterson tank should measure at least 20 ounces.
You will need
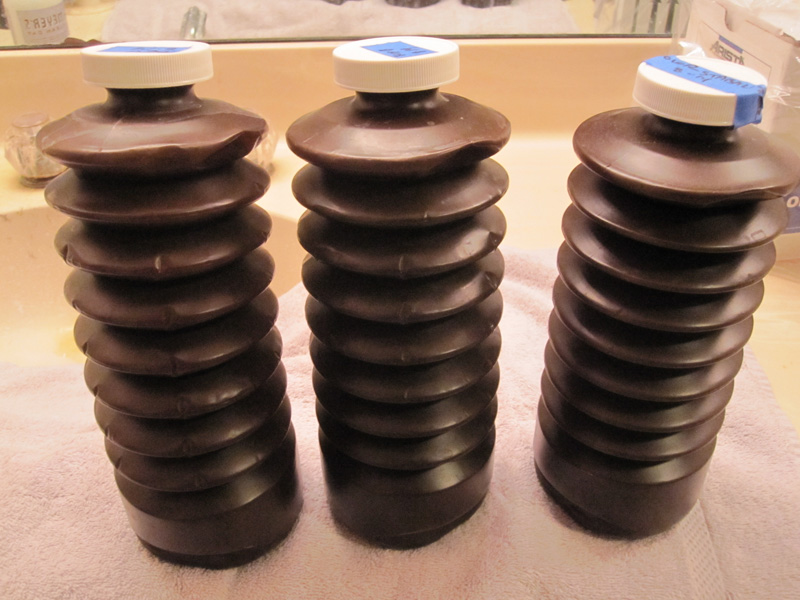
three containers for color developing. They should be the size of the chemicals you buy, in this case one liter. If you are buying one gallon mixes, you need 1 gallon containers. I'd recommend just getting smaller containers and mix since the shelf life of color developer can be somewhat limited.
My kit has three chemicals, but some may have more. E-6 kits have 4 chemicals, I believe. Just read the instructions.
You will need a timer, as well, to keep track of developing time. I just use my cell phone timer. Optional but useful supplies include a funnel for pouring chemicals back into the bottles, and Photo-Flo to help prevent water spots at the end. You will also need some way to hang your film to dry. I use office clips and rubber bands on my shower rod (ouch!).
Needless to say (though I say it), you also need a dark room (I use my bathroom) or a dark bag, but only for spooling your film. Everything else is done in daylight once the film is in the tank. For color developing, you need hot running water. I use my bathtub. That's it! Aside from chemicals and color film.
To summarize in fewer words, for color developing you need:
thermometer,
developing tank and spool,
measuring container,
chemical storage containers x 3,
dark room or dark bag,
hot water source, and
timer, plus
color chemicals and
color film.
There are a few options for color developing chemicals. I use the
Unicolor C-41 Kit, which I buy from
Freestyle Photographic, honestly because it is the cheapest kit at $17.99. I haven't had issues with it (though any home developing isn't without its issues), so I continue to use it. It comes with directions, so pretty much what I am telling you here is in the instructions. This is more about showing you my method and how easy it is...I still follow the directions that come with the kit.
In the box you get four packages of chemicals. Follow the mixing directions, of course. You will need hot water at 110F (44C) for mixing. When I say 110F at this point, I just mean
hot water. Getting your chemicals to the right temperature is important for developing, not so important for mixing. The powders just dissolve better in hot water. The
developer is in a single package and goes into
Bottle 1 to make 1000ml (use water at 110F).
Make sure you label and date your containers. Blix is made up of Part A and Part B (two packages) and both go into
Bottle 2 to make 1000ml (use 110F water). The third mix is
stabilizer, which goes into
Bottle 3, and can be room temperature. Ideally, using bottled water is best to avoid contaminants in the water, but I don't have any way to get bottled water hot like that without it being a pain, so I just use hot bath water.
A note about the chemicals. The developer is a bit nasty, but the blix is very nasty. I wrap my developing tank in a towel while developing and avoid carpets, because blix is dark red and will probably never wash out of anything. Also, blix is a bleaching agent, so try to keep it off of your clothes. I don't worry much about keeping it off of my skin or anything like that...I've never felt anything from it, but I don't dip my hands in it either. The stabilizer seems fairly benign, but, as with any chemicals, try to keep it off of your skin and out of your eyes.
First off you need to spool your color film and put it in the tank. I'm not going to go into details on this as there are a million online resources to help you. All I can offer is that if you are new to this, sacrifice a roll and practice in daylight, and try with your eyes closed. With my plastic reel, it usually takes me less than a minute if the film isn't stupid curly. Once you have your film in the tank, everything from here on out is done with the lights on.
If you are developing right after mixing your chemicals, getting the temperature correct is easier because the water is already hot. This is the biggest turnoff for most people when it comes to color developing...getting the chemicals hot enough. Black and white developer is usually at 68F, while color developer and blix needs to be at around 102F. It's really not that big of a deal. I take my developer and blix bottles (making sure the caps are securely fastened) and put them in the tub under the hot water tap.
Simple as that! I let it sit like this for about five minutes and check the temperature with my thermometer. The developer should be around 102F (39C). Better to be a couple degrees warmer than a couple degrees cooler, because it won't maintain that temperature while developing.
Step one is a presoak. Fill your tank with hot water and let it sit for
1 minute, then dump out the water. The waste water will probably be green or red, depending on film type. This is just the anti-halation layer coming off, which I guess makes the film more receptive to the developer.
Step two is the developer. Once your developer is hot, measure out 20 ounces and pour it into the tank. I wrap my tank in a towel to avoid dripping and to help insulate to prevent cooling. Development time is short, and I've found that after developing, my temperature is still about the same in the tank:
Once you pour your developer in the tank, start your timer. The directions state to develop for
3.5 minutes. I develop for
4 minutes with fresh developer, and
4.5 minutes for older developer. I rap hard on the tank a couple times to get the possible bubbles off the film. Then pick up your tank and invert (turn upside down, right side up, upside down, etc.) for 10 seconds, then set the tank down. Then at the 30 second mark, pick up your tank and do 4 inversions, and then put the tank back down. Do this at every 30 second mark, 4 inversions each time, until the developing time is up. You can hold your tank, but I think it's best to let it sit quietly between inversions so you aren't adding any additional agitation. Also, I turn my tank one quarter of a turn after each set of inversions so I'm not always inverting in the exact same direction, increasing developer coverage across the film. After the time is up, pour your developer back into the appropriate bottle. It is reusable, so don't dump it down the sink or whatnot.
Step 3 is blix. Your blix should be 95F-105F, so you have a wider temperature range to work with. Same as with the developer, pour 20 ounces of blix into your tank, start your timer, rap a couple times on the bottle, wrap in a towel, do 10 seconds of inversions, then 4 inversions at every 30 second mark. Blix time is
6.5 minutes. After the blix time is up, pour it back into the blix bottle.
Step 4 is the wash. After the blix, you can take the lid off of your tank as the film is no longer sensitive to light. Let your film rinse under the hot tap for 3 minutes.
After rinsing, pour 20 ounces of room temperature stabilizer into the open tank, agitate for 15 seconds, let it sit for 30-45 seconds, then pour the stabilizer back into the stabilizer bottle.
I use Photo-Flo on my film to help prevent water spots.
About half an eyedroppers worth into the tank, add water to above the spool, agitate for 30 seconds, and sit for 30 seconds, then dump it out. At this point, you are basically done and can remove the film from the spool!
Hang your film, squeegee off the excess water (I use my fingers), and let it dry (I use a small fan). Once it is dry, cut it however you want (I cut it into four, with three shots per cut). Simple!
Like I said, all the directions are with the kit and very easy to understand, but to reiterate how easy this is, here is a summary for the Unicolor kit:
1. Prewash hot water 1 minute.
2. Developer at 102F for 3.5 to 4.5 minutes, 10 seconds of inversion then 4 inversions every 30 seconds.
3. Blix at 95F-105F for 6.5 minutes, 10 seconds of inversion then 4 inversions every 30 seconds.
4. Wash under hot tap for 3 minutes.
5. Stabilizer for 1 minute, with agitation for first 15 seconds.
6. Photo-Flo for 1 minute, with agitation for 30 seconds.
7. Hang, squeegee and dry, then cut and scan.
And there you have it!
Home color developing. It takes less than 30 minutes to develop, and I feed two rolls of 120 film onto my reel per development. So, how are the results? Pretty nice in my opinion. A couple examples of self-developed Kodak Ektar.
Kodak Vericolor, expired 1995...
And Konica Centuria 100, expired 2006 (and in bad shape).
Overall, I get excellent results from my home developing. Occasionally I do get some funkiness on my negatives, possibly from poor inversion by me or chemicals getting old. Here are two examples of developing weirdness. The first shot, I forgot to prewash, so definitely my fault...poor coverage of developer, I guess. No idea what's going on in the second shot, though I did accidentally open up the film back while the film was in the camera, but that's not light leakage there...and it was only on a couple shots, not the entire roll.
But, honestly, I've had labs screw up my film a lot worse than I have doing it myself. My success rate is pretty high.
I guess I should mention the life expectancy of color developer. According to the instructions it is good for about eight rolls of 120 film. But is does say that, basically, you can keep using it until you don't like the results anymore. I have thrown out chemicals just because it's been four months since I last used them and didn't want to risk ruining my film. But I generally keep using them for a couple months at least and have developed 20 or so rolls from a single batch of chemicals with no ill effect. I've read of people using the same developer for a couple years. Storage and room temperature probably has a lot to do with how long it lasts. Keeping the bottles airtight and relatively cool will help extend your chemicals lifespan. Sudden death of the chemicals is unlikely...you will just start to see gradual color shifts and probably increased grain. Regardless, home developing is very economical - 8-20+ rolls for $18 versus paying someone $5 a roll for development.
My next task is to tackle E-6 development, which is about the same as C41 with an extra step. Just waiting until I have a few more 120 rolls and 4x5 sheets to develop before I start.
I've also put together a little Blurb book...more info when I make it available for sale. Until next time, have fun developing!