
There are plenty of online resources on film developing, but I've had a couple requests to do this post. Developing color film is really very easy, no more difficult than black and white...but it probably helps to have some experience with home developing. I'm not going to talk at all about black and white developing, as there are even more resources available (I recommend the book Into Your Darkroom Step by Step), but I will go through color developing as if you don't have any idea what I am talking about. I don't even have a darkroom, just a bathroom without windows, and I pretty much develop all of my own film. Small learning curve for basic developing, and then the options are limitless, from kits to mixing your own chemicals. The way I do it is as basic and cheap as it gets...and it works! I will be using 120 film and C41 developing, but the same process works for 35mm (or 127, etc), but getting 35mm developed is easy as most drugstores and Walmart type stores develop 35mm color in house.
First off, you will need some supplies. The most expensive thing you will buy is a thermometer. You need to get a "real" thermometer, not something from the drugstore. Mine looks like this:

You also need a developing tank. There are many different brands, as well as plastic tanks and reels, and metal tanks and reels. I use a plastic Patterson tank setup, good for a single 120 spool (that I feed two 120 rolls onto), or two 35mm spools. This is the tank that will be used to develop the film.


You will need a timer, as well, to keep track of developing time. I just use my cell phone timer. Optional but useful supplies include a funnel for pouring chemicals back into the bottles, and Photo-Flo to help prevent water spots at the end. You will also need some way to hang your film to dry. I use office clips and rubber bands on my shower rod (ouch!).
Needless to say (though I say it), you also need a dark room (I use my bathroom) or a dark bag, but only for spooling your film. Everything else is done in daylight once the film is in the tank. For color developing, you need hot running water. I use my bathtub. That's it! Aside from chemicals and color film.
To summarize in fewer words, for color developing you need: thermometer, developing tank and spool, measuring container, chemical storage containers x 3, dark room or dark bag, hot water source, and timer, plus color chemicals and color film.
There are a few options for color developing chemicals. I use the Unicolor C-41 Kit, which I buy from Freestyle Photographic, honestly because it is the cheapest kit at $17.99. I haven't had issues with it (though any home developing isn't without its issues), so I continue to use it. It comes with directions, so pretty much what I am telling you here is in the instructions. This is more about showing you my method and how easy it is...I still follow the directions that come with the kit.
In the box you get four packages of chemicals. Follow the mixing directions, of course. You will need hot water at 110F (44C) for mixing. When I say 110F at this point, I just mean hot water. Getting your chemicals to the right temperature is important for developing, not so important for mixing. The powders just dissolve better in hot water. The developer is in a single package and goes into Bottle 1 to make 1000ml (use water at 110F). Make sure you label and date your containers. Blix is made up of Part A and Part B (two packages) and both go into Bottle 2 to make 1000ml (use 110F water). The third mix is stabilizer, which goes into Bottle 3, and can be room temperature. Ideally, using bottled water is best to avoid contaminants in the water, but I don't have any way to get bottled water hot like that without it being a pain, so I just use hot bath water.
A note about the chemicals. The developer is a bit nasty, but the blix is very nasty. I wrap my developing tank in a towel while developing and avoid carpets, because blix is dark red and will probably never wash out of anything. Also, blix is a bleaching agent, so try to keep it off of your clothes. I don't worry much about keeping it off of my skin or anything like that...I've never felt anything from it, but I don't dip my hands in it either. The stabilizer seems fairly benign, but, as with any chemicals, try to keep it off of your skin and out of your eyes.
First off you need to spool your color film and put it in the tank. I'm not going to go into details on this as there are a million online resources to help you. All I can offer is that if you are new to this, sacrifice a roll and practice in daylight, and try with your eyes closed. With my plastic reel, it usually takes me less than a minute if the film isn't stupid curly. Once you have your film in the tank, everything from here on out is done with the lights on.
If you are developing right after mixing your chemicals, getting the temperature correct is easier because the water is already hot. This is the biggest turnoff for most people when it comes to color developing...getting the chemicals hot enough. Black and white developer is usually at 68F, while color developer and blix needs to be at around 102F. It's really not that big of a deal. I take my developer and blix bottles (making sure the caps are securely fastened) and put them in the tub under the hot water tap.

Step one is a presoak. Fill your tank with hot water and let it sit for 1 minute, then dump out the water. The waste water will probably be green or red, depending on film type. This is just the anti-halation layer coming off, which I guess makes the film more receptive to the developer.
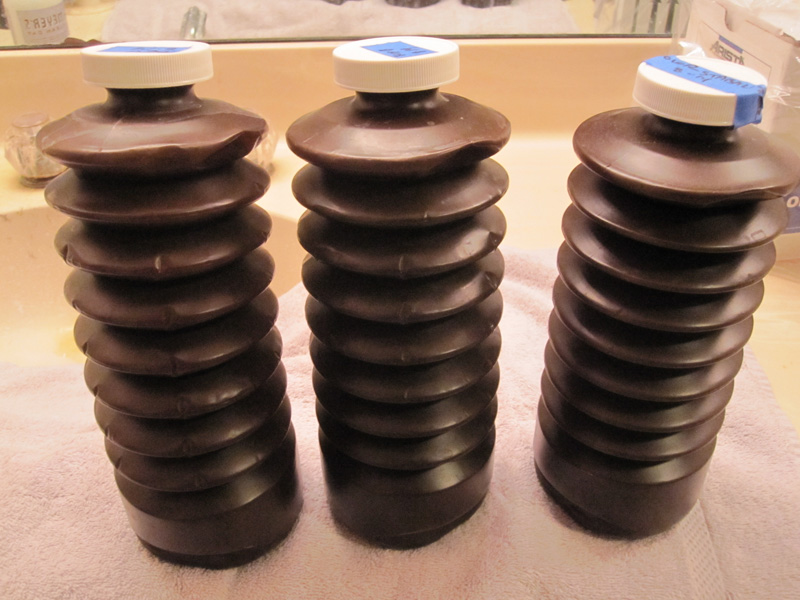
Step two is the developer. Once your developer is hot, measure out 20 ounces and pour it into the tank. I wrap my tank in a towel to avoid dripping and to help insulate to prevent cooling. Development time is short, and I've found that after developing, my temperature is still about the same in the tank:

Step 3 is blix. Your blix should be 95F-105F, so you have a wider temperature range to work with. Same as with the developer, pour 20 ounces of blix into your tank, start your timer, rap a couple times on the bottle, wrap in a towel, do 10 seconds of inversions, then 4 inversions at every 30 second mark. Blix time is 6.5 minutes. After the blix time is up, pour it back into the blix bottle.
Step 4 is the wash. After the blix, you can take the lid off of your tank as the film is no longer sensitive to light. Let your film rinse under the hot tap for 3 minutes.

I use Photo-Flo on my film to help prevent water spots.


Like I said, all the directions are with the kit and very easy to understand, but to reiterate how easy this is, here is a summary for the Unicolor kit:
1. Prewash hot water 1 minute.
2. Developer at 102F for 3.5 to 4.5 minutes, 10 seconds of inversion then 4 inversions every 30 seconds.
3. Blix at 95F-105F for 6.5 minutes, 10 seconds of inversion then 4 inversions every 30 seconds.
4. Wash under hot tap for 3 minutes.
5. Stabilizer for 1 minute, with agitation for first 15 seconds.
6. Photo-Flo for 1 minute, with agitation for 30 seconds.
7. Hang, squeegee and dry, then cut and scan.
And there you have it! Home color developing. It takes less than 30 minutes to develop, and I feed two rolls of 120 film onto my reel per development. So, how are the results? Pretty nice in my opinion. A couple examples of self-developed Kodak Ektar.


I guess I should mention the life expectancy of color developer. According to the instructions it is good for about eight rolls of 120 film. But is does say that, basically, you can keep using it until you don't like the results anymore. I have thrown out chemicals just because it's been four months since I last used them and didn't want to risk ruining my film. But I generally keep using them for a couple months at least and have developed 20 or so rolls from a single batch of chemicals with no ill effect. I've read of people using the same developer for a couple years. Storage and room temperature probably has a lot to do with how long it lasts. Keeping the bottles airtight and relatively cool will help extend your chemicals lifespan. Sudden death of the chemicals is unlikely...you will just start to see gradual color shifts and probably increased grain. Regardless, home developing is very economical - 8-20+ rolls for $18 versus paying someone $5 a roll for development.
My next task is to tackle E-6 development, which is about the same as C41 with an extra step. Just waiting until I have a few more 120 rolls and 4x5 sheets to develop before I start.
I've also put together a little Blurb book...more info when I make it available for sale. Until next time, have fun developing!
thanks sean...this is a great description, and just what i needed, as i'm hopefully going to get a darkroom set up in the next few months. i've only ever done b+w development, and that was 10 years ago! so i think i'm due for some trial-and-error...i'll let you know how it goes! :)
ReplyDeletewow... ok, I actually might do this!
ReplyDeletegreat post. I am curious, when your chemicals are no longer viable, how do you dispose of them? that is one of the things that is keeping me away from doing my own b&w and color film.
ReplyDeleteCall up your local community college chemistry department and ask where they dispose of their chemicals.
DeleteSomething I've been meaning to do, and after reading your very well-written and easy to follow post (with photo illustrations to further assist!) you have given me confidence I can do this too! Thanks Sean.
ReplyDeleteDo you print your photos with an enlarger, etc., or just scan the negatives?
Nice! I may need to do this as I can not afford to get my box of film done at a shop! Your blog inspires me every time I visit! :)
ReplyDeleteI pour my chemicals into the toilet. The amount is so small and dilute that it's but a drop in the bucket, I figure. There are some place that will dispose of it for you, but I doubt that any industrial disposal of chemicals is any better for the environment.
ReplyDeleteI scan all of my negatives. I don't currently have a real darkroom or enlarger...someday!
A great article Sean, I've had a kit for about 6 months with the intention of developing my first roll. You may have given me the nudge I needed!
ReplyDelete..
ReplyDeleteHey! nice post.
Yesterday night I've tried my first 35mm color roll. I've used Fuji Chemicals (CN-16) and the result is pretty good.
Since I've being using my fingers to get rid of the water excess like you and when I do BW film, one of the frames of this color film were ruined. There is a very "nice" and "gentle" and deep scratch on it. The 21 other frames are good.
Have you ever tried just hanging it up and let it dry?
Being the film at a higher temperature after the last bath (comparing to BW) wouldn't make it more sensitive to physical damage?
yeah the emulsion might be softer from higher temps. i've never had scratches, but you can by a film squeegee. if you don't squeeze the water off you will probably get lots of water spots. unless you have some sort of hot blower to blast the water off and dry it quickly.
ReplyDelete..
DeleteI've tried E-6 process twice last week. For both batch I've used a hair dryer (not hot, but warm) after last bath. It worked well. Not a single water drop mark.
I've also made the last bath, at room temperature instead of 38 Celsius degrees like the last time doing C-41 process.
=)
Best of luck y'all. As one who has done it several ways - manual agitation, semi automated, gaseous burst agitation(not what you think!) and roller transport, I say - get someone else to do it! You can get some very good results with home processing. Somewhere I have nice Cibachrome (google it) I printed in 1977 in my crude home darkroom.
ReplyDeleteThe problem with using these kits is consistency. With black and white you can do a terrific job at home with minimal effort. Color neg and slide are a lot more difficult, Slide film in particular. Color films are extremely sensitive to very slight temp variations, less than 1/2 degree in the developers, variations in agitation,and even how long it takes you to pour chemicals in and out of the tanks.
Drying the film - The stabilizer should contain a wetting agent to help the water roll off, like Photo Flo. If you find the water beading up, then probably a dunk in Photo Flo wouldn't hurt. Hang the film in dust free environment with weighted stainless steel clips. I've built a film dryer from an old cabinet, blower motor, and hair dryer heater, and air conditioner filter. Cheap, simple, and it worked !
Sean, thanks so much for this write up. I may point some people to it on my flickr pool for film shooters.
ReplyDeleteI've usually got about 20 - 30 rolls per Unicolor kit. I also make a point of doing as much as possible in as short a time span as possible. I may develop the 20 rolls over the course of 5 - 10 days. I'm not sure if this helps or not but someone mentioned that the chems 'age' and the sooner you use them the better and more consistent the results due to the chems now being exposed to air/oxygen. I'm not sure but its an easy thing to do since I do bulk processing at about 6 rolls per time.
For the price of the kit I can't be bothered "cheaping out" for a couple of more rolls and risk a result I regret for the price of a kit.
cheers Jan
Thanks for posting this! I just recently pulled out some old cameras and was looking at the medium format thinking about whether it was time for me to get set up to develop at home. I was quite fortunate and my aunt gave me many components for an at home dark room setup. I did some pinhole photography a few years ago, but haven't done much else yet. I really should get back on developing my film though! I didn't realize how easy color was, so I will try that out as well!
ReplyDeleteGood info for the frugal film photographer (hmmm...sounds like a book title). Many retailers (Wal-Mart, Walgreens, CVS, etc) are phasing out film processing altogether, though I disagree whole heartedly about flim being dead, it's just moved out of the commercial realm for the most part. Suppliers are alive and well, and 120 is even making a fresh come back. Southern CA is a mecca for quality film and darkroom equipment, and entry level pro outfits can be had on ebay for a fraction of late model DSLR setups. Film is alive and well!
ReplyDeleteHi,
ReplyDeleteGood write up on color film developing. Although lomography is new to me, I really like your Flicker photos. Will save up for a "toy" (120) camera. My photo blog, a sort of snapshot nature, lifestyle photography, is texasweeds.blogspot.com.
Ellard
I need a filemaker developer. Does anyone know of one I can contact?
ReplyDeleteWow! This post is so helpful. All I have heard is how hard it is to develop color film but you make it seem "do-able". Thanks!
ReplyDeleteThe publication of your article is exactly what I was looking for. I want to develop the 50+ rolls of 35mm that has sat in my closet for years. From what I've been researching, Paterson equipment will complete my prints. Good stuff!! Thanks
ReplyDeleteCan I process the normal 35mm film (shot in colour) By using the B&W method?
ReplyDeleteThanks...
ReplyDeleteNice..
ReplyDeleteCool! You are very resourceful knowing that people nowadays are using the digital cameras and need not to develop the film. Thanks for your recommendation in using the chemical for filming. I have a lot of films that needed to be developed and because I don't have a dark room I will apply those tips that you've shared.
ReplyDeletenice..
ReplyDeletenice..
ReplyDeleteLabs have been screwing up my film for years, I'm going to take the plunge to start doing it myself thanks to your helpful post
ReplyDelete